Table Borders - FrontPage
Adding A Border To Your Table In FrontPage
Adding borders to your table can make it look neater and set it apart from the other content on your web page. Table borders can be of different colours and varying widths. Although frowned upon in these days because of the widespread us of CSS (cascading style sheets), many people still use tables to layout their pages and line elements up. If you are using tables to layout your page, you would remove the table borders so that nobody could see that a table was there.
Adding A Single Colour Table Border
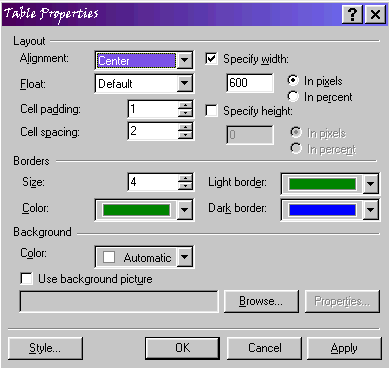
To add a single colour table border, right click anywhere in your table > table properties. In the borders section of the table properties dialogue box, either type in the border size manually or click and hold on the up or down arrows to the right of the input box to increase or decrease the border thickness.

Click on the down arrow next to the colour box and select the colour you want.
Adding A Duo Colour Table Border
To add a duo colour table border, right click anywhere in your table > table properties. Click on the down arrow next to Light border and choose the colour you want for the top half of the table. Click on the down arrow next to Dark border and select the colour you want for the bottom half of the table. Click on the arrow next to Colour and choose a colour for the border of the table. Dup colours for tables only display in Internet Explorer, so specifying a border colour will ensure that your table has a border colour when visitors use different browsers.
Removing Table Borders
To remove table borders, right click anywhere in your table > table properties. Set the border size to 0, either by typing the number manually or by clicking and holding on the down arrow to the right of the input box. When you click OK, the table will have no border.